Installation steps
Install the O3C-server as described in the guide "AXIS O3C Server Reference. Windows and Linux Versions" (Technical Reference Document. AXIS One-Click Cloud Connection Server 2.30.0), part 2.2.2.
Important things:
-
Install the O3C-server as described in the guide "AXIS O3C Server Reference. Windows and Linux Versions" (Technical Reference Document. AXIS One-Click Cloud Connection Server 2.30.0), part 2.2.2.
Important things:
-
setup provider certificate authority:
Directory in which the CA should be set up [default: ca]: (by default ca)
Passphrase for the CA key (DO NOT FORGET THIS!) [default: N/A]: pAs_sw!ord (some password)
Valid time, in days [default: 7300]: 100 (any number)
Issue a server certificate:
Path to the CA directory [default: ca]: (as above)
Passphrase for the CA key [default: N/A]: pAs_sw!ord (as above)
Subject Alternative Names (separated by comma) [default: N/A]: 172.17.102.56 (very important!!! Should be equal IP address of O3C server)
Valid time, in days [default: 398]: 100 (as above)
Result:
Concatenated server certificate and key saved to: ca/issued/stserver_EA363E5578E696E7.pem
Register O3C server as service in Windows SCM: there is needed the Power Shell tool for Windows! And for install call:
.\setup_service.ps1 add -c C:\o3c-server\o3c-server.conf
Configure o3c-server.conf
listen_client = 172.17.102.56:80
IP and port where the server will wait for the client (the camera) connections
stserverid = test_o3c_server
Any string
cert_file = C:\o3c-server\stserver_EA363E5578E696E7.pem
issued server certificate created after command: "pkitool issue-server-cert"
provider_ca = C:\o3c-server\stserver_ca.crt
CA certificate from ca directory created after the command: "pkitool setup-provider-ca"
provider_name =
can be left blank
credentials = root:root
for device access requests
O3C-server service
By default, the service is called Axis O3C Server in Services or O3C-server in command prompt.
-
Start the O3C-server service
-
Enable One-click technology on the camera as described in the 4.1 part of the guide.
-
Disable firewalls or add O3C-server to the exceptions
-
Register the camera as described in guide 4.2 part.
-
where:user=adp_mirasys_100, pass=GQ41lSRbbEb4w3sorkN8 - Mirasys credentials (Provider name and password) from Axismac=B8A44F17AAFA, oak=8A22D6434817 - MAC address and OAK key from the camera
-
To find the MAC address using the following string in the browser: http://172.17.100.84/axis-cgi/admin/param.cgi?action=list&group=Network
-
server=172.17.102.56:80 - as "listen_client" in o3c-server.conf
-
Check that the camera was connected to the O3C-server: call in the browser th string: http://172.17.102.56:80/admin/status.cgi 172.17.102.56 - IP address of O3C-server
-
And check that there is a comment about the connected client as follows: "id=4.b8a44f17aafa srcaddr=172.17.100.84:34148 accepted=1 v=2 rx=0 tx=0 connected=2022-01-10T12:45:40.875571Z
Total number of clients: 1"
PS: the camera tries to connect to the server every 20 seconds
-
Check that we can get options from the camera: for that, it needed to configure the proxy settings for browser -
-
Open system Internet Options
-
Select Connections tab -> Select LAN settings button -> to enable "Use a proxy server for LAN (...)" and input the proxy IP address and port. (in the current case there is a local IP address and port 80)
-
After that we can get the camera capabilities in the browser:
-
http://b8a44f17aafa/axis-cgi/param.cgi?action=list&group=root.RemoteService where b8a44f17aafa - MAC address of the camera
-
Filter for wireshark for Axis P1375:
((ip.src == 172.17.100.84) && (ip.dst == 172.17.102.56)) || ((ip.src == 172.17.102.56) && (ip.dst == 172.17.100.84))
Add Axis One-Click Camera
-
Open System tab
-
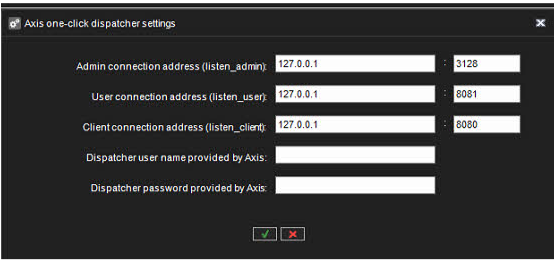
Go to System Settings and open Axis one-click dispatcher settings
-
Enter all necessary details and click OK
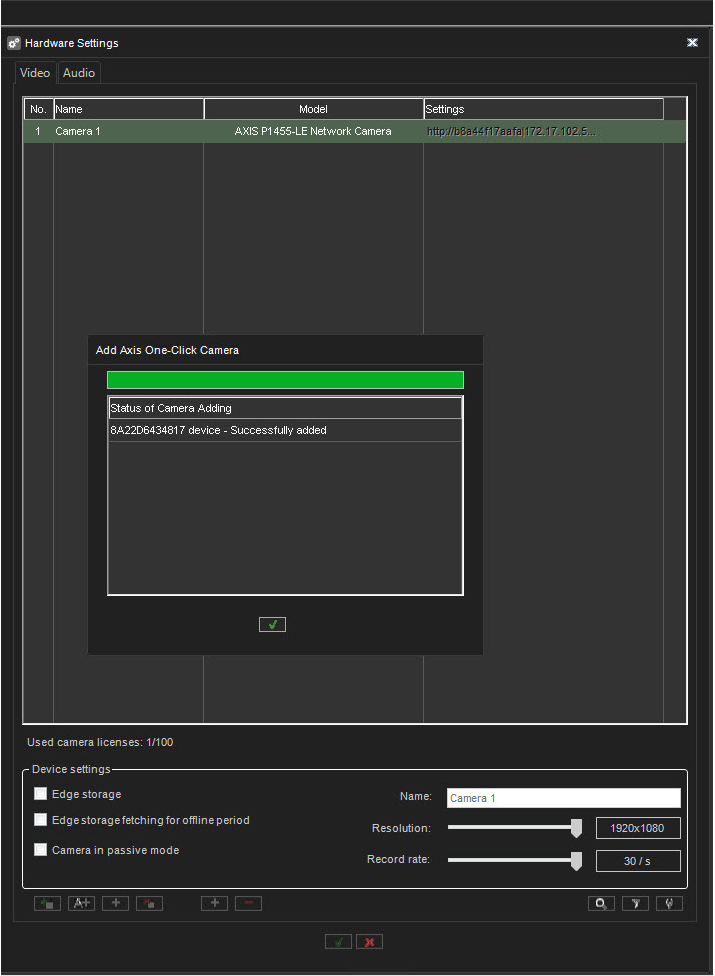
4. Open the VMS Servers tab
5. Click Hardware
6. Click Add Axis One-Click Camera icon

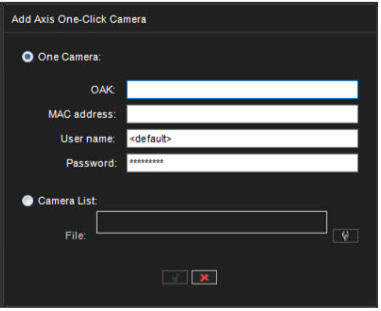
7. Enter Axis One-Click Camera details and click OK
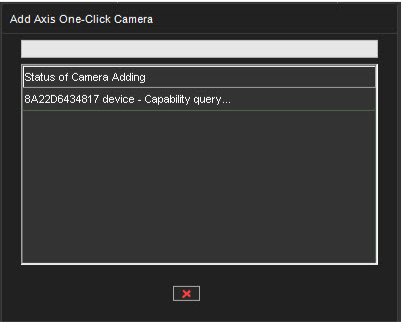
After clicking the OK, the camera query starts
When the camera query is finished, the device will be added to the hardware list
8. Click OK to finalize