In storage settings, you can set the storage time of the recorded video, audio and text data, and alarm data.
In addition, after adding a hard disk to a server, you can set it as additional data storage through the storage settings.
The storage settings are also used to configure the automatic archiving functionality, enabling the creation of backup copies of the server-specific video, audio, and text data daily or weekly.
Video, audio, text data, and alarm recordings are kept until their defined Maximum date has been exceeded or until the allocated storage space has run out.
Adding Storage Space
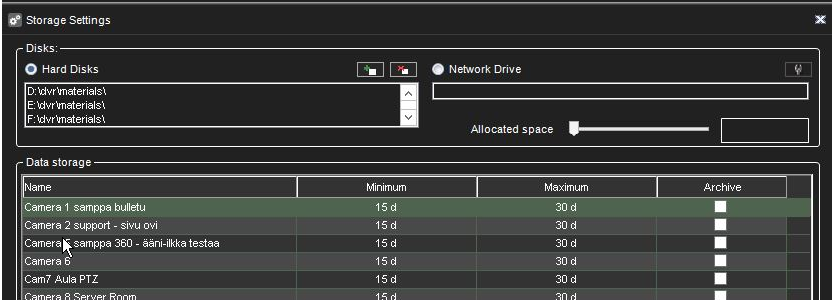
If additional storage space is required, you can add new hard disks or map a network drive for data storage (i.e., NAS support).
There can be multiple network storage disks, and local disks used simultaneously, as seen in the picture.
Note: When adding storage drives to legacy Mirasys filesystem (VMS server version 7.5.x or earlier), the storage drives are recommended to be all of the same capacity, and any single disk should be less than 10TB in size, and the total amount per VMS server should be less than 25 TB in size.
The use of multiple storage disks has the benefit of allowing material write to be distributed to all the drives, making a loss of any single material drive less likely to wipe out large parts of the stored material.
To add a hard disk:
-
Install the new disk.
-
In Storage Settings, click Add Disk.

-
The Add Disk dialogue box is shown. The Minimum free space on the new disk box shows how much free space the new disk must-have.
-
Select the disk from the list and click OK.
To map a network drive:
-
In Storage Settings, mark the Network drive checkbox.
-
If needed, click Define network drive to open the network drive configuration screen.

-
Type the network drive username and password into the Username and Password fields.
-
Type the location of the network drive into the Network drive path field.
-
Click OK.
-
Use the Allocated space slider to set the space reserved on the network drive for data storage.
To map multiple network drives:
-
Install and configure the networks storage to work as a locally mapped drive (for example, use iSCSI initiator or similar).
-
In Storage Settings, click Add Disk.

The Add Disk dialogue box is shown.
-
Storage size cannot be configured for iSCSI disks.
-
Click ok to store settings. Repeat for other disks.
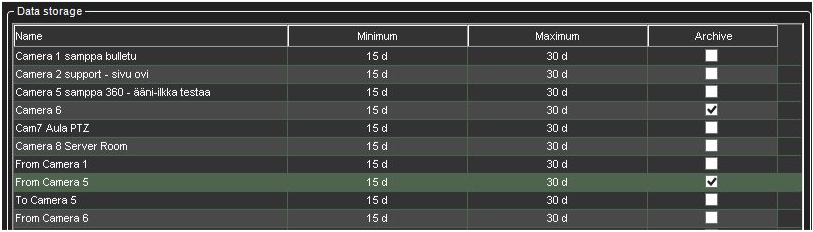
Video, audio and text data storage settings
Minimum
To prioritize recordings from one or more video, audio or text data channels, ensure that the minimum values are sufficiently low for other channels.
Then set the value higher for the high priority channel or channels.
If you select Automatic, the system deletes recordings from channels that use the most storage space.
Maximum
The system examines the recordings daily and deletes those that are older than the maximum number of days.
If you select Automatic, the recordings will be deleted only when the free space is not sufficient.
Note: If the minimum values are too high for some channels while, at the same time, they are not set for other channels, the system will delete recordings from the channels with no set minimum.
Alarm limits
Minimum
The system deletes alarms that are older than the minimum value.
If you select Automatic, the system deletes alarm recordings from channels that use the most storage space.
Maximum
The system examines the alarm recordings daily and deletes them older than the maximum number of days.
If you select Automatic, the recordings will be deleted only when the free space is not sufficient.
Log entries
This value specifies how many alarm events will be kept in the alarm log at the most.
The system examines the number of log entries hourly and deletes the oldest entries if they are exceeded.
% maximum
This value specifies how much storage space alarm recordings are allowed to use of all storage space.
As long as all storage space is not used, alarm recordings can use more space than this value.
The system first deletes the oldest alarm recordings before deleting other video or audio recordings if all storage space is used.
Automatic Deletion of Video, Audio and Text Data
After exceeding the defined maximum storage time, stored video, audio, text, and alarm data is automatically deleted—the maximum storage time for data the system checks daily.
As the size of a stored data stream can vary significantly due to movement in the video image, changes in audio levels, or the number of text data events, it may be hard to predict storage space requirements accurately.
Thus, sometimes the system may deem it necessary to ensure free storage space by automatically deleting old material regardless of the maximum storage time.
If data needs to be deleted to ensure free storage space, the deletion process proceeds through the following pattern:
In simple words this retention process goes like this when FS need a new free file:
-
Check alarm quota, if alarm material files count in more then set in quota (% from all data) we cleanup oldest alarm file and reuse it
-
Check min settings for alarm data - if alarm channels have data that exceed min alarm settings – we take the oldest file from those, cleanup it and reuse
-
Check min settings for all material channels (video, audio, data) - if some channels have data that exceed min settings – we take the oldest file from those, cleanup it and reuse
-
Check the oldest file from channels with auto min settings if they are present, if so - we take the oldest file from those, cleanup it and reuse
-
If still, nothing is found – we just take the oldest file from all channels (material and alarm), clean up it and reuse
Also, we have a background task that cleans up material files according to max settings.
The launch period is set to a minimum max setting from all channels (material and alarm).
Note: To ensure that the need for automatic deletion due to a lack of disk space is minimized, it is good to monitor the disk usage regularly and alter the maximum storage time and allocated disk space.
It is advisable to use manual or automatic archiving tools to ensure that no relevant data is deleted in storage space issues.
Hint: You can set a Watchdog event to notify you if the storage space runs low.
Archiving
You can set the system to automatically archive video, audio, and text data daily or weekly.
The archive files can be automatically created on the server’s hard disks or a network drive.
The archive files can be opened on any Spotter client.
Note: Archive files can be huge, and thus they can fill storage space quickly. Archive files should be regularly copied and removed from the server hard disks or network drives on which they are automatically saved.
To set an automatic archiving schedule:
-
In the Data storage pane, click on the devices you want to include in the automating archiving process.
TIP: Select adjacent devices or folders, hold down the SHIFT key and then click the first and last device you want to select.-
To add a device to a selection or remove it from a selection, keep the CTRL key pressed and then click the device you want to add or remove.
Note: Selecting a device group (folder) also selects its contents.
-
-
Mark the Archive checkbox.
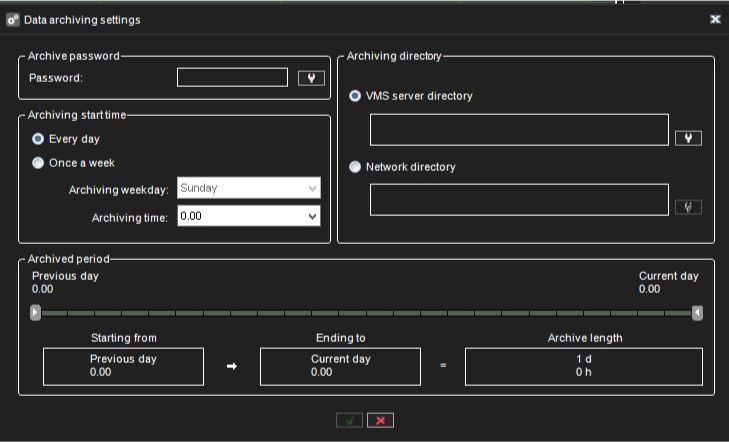
3. Click Modify archive settings

4. Set the archive password by clicking Change archive password
5. Select whether to create the archive daily or weekly by selecting Every day or Once a week
6. If you set archiving to occur daily, use the Archiving time drop-down menu to select the time on which the archive files are created.
7. If you set archiving to happen every week, use the Archiving weekday and Archiving time drop-down menus to select the date and time on which the archive files are created.
8. Use the Archived period slider to set the period used in the archive files.
9. Select whether to create the archives on a local drive (on the server) or a network drive by selecting the VMS Server directory or Network directory.
10. Click the Change directory or Change network drive button to set the directory to save the archives.
11. Click OK to set the archiving schedule
Use OS cache
DVMS 8. x and newer have the possibility to enable OS cache usage when accessing the physical disk.
DVMS 9.4 and newer have the possibility to set maximum OS cache size.
Any software can access the disk in direct access mode when OS doesn't use any caching and using OS cache.
The last one helps to deal with unstable load to HDD and caching most used parts of data.
Windows Server and Windows desktop versions have different priorities for applications - Windows Service priorities background services and desktop version priorities UI applications.
Also, Windows Server uses more system resources to cache e.g. HDD access and can use up to 90% of RAM for this.
To avoid situations when all RAM is occupied by file system cache DVMS 9.4 and newer has an option to limit max OS cache size.
Max OS cache setting is valid until PC reboot, so they are set each time recorder starts.
