This integration gives you the option to get camera side license plate detections to Mirasys VMS and update camera license plate lists.
You can find here a guide on how to use this Spotter Plugin.
More details about supported cameras can be found here.
Main features
-
Live monitoring from one camera at the same time
-
Plate number search from one camera at the same time
-
Plate number list Management
-
Black list
-
White list
-
-
Importing and exporting plate number lists
-
Uploading plate number list to the cameras
-
Digital output controlling based on:
-
Other plate detected
-
Black list plate detected
-
White list plate detected
-
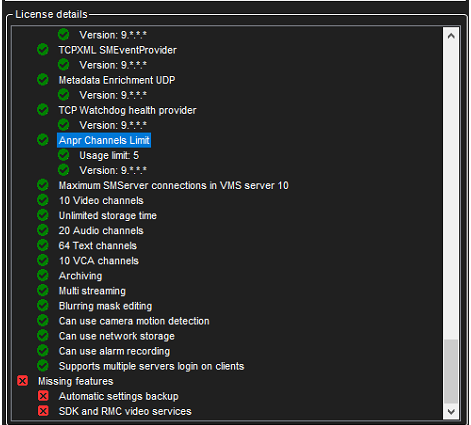
Licensing
Mirasys VMS server license defines how many ANPR channels can be added.
The feature name is Anpr Channels limit and controllable value name Usage limit
Configuration process
-
Configure LPR functionality for the used cameras. Please see the manufacturer's website for more information
-
Check that license plates are correctly detected on the camera side
-
Add cameras to the Mirasys VMS
-
Use a camera native driver
-
-
Check that Mirasys VMS license supports LPR cameras
-
Enable Easy LPR
You can find here the supported camera list. On that list are mentioned tested ANPR/LPR cameras.
Depending camera manufacturer's API there is a possible need to make changes on the camera side xml.
Camera specific configurations
If there is no camera manufacturer specific guidance. Then you can follow normal “How to Enable Easy LPR” guidance.
Axis and Axis License Plate Verifier
-
Check that you have the latest Axis License Plate Verifier software installed on the camera
-
Check that the Axis License Plate Verifier is licensed and working correctly
-
Check that you are using the latest Axis driver for VMS
To get the Axis License Plate Verifier to send data to the VMS Server, there is a need to edit the driver xml file
-
Open NewAxisIPCapture.xml and edit this using Notepad
-
Default location C:\Program Files\DVMS\DVR
-
-
Find this section
<!-- Axis License Plate Verifier configuration --> <AxisANPR> <!-- Possible values: Any IPv4 address. Empty value means default interface. --> <!-- Several IP addresses should be semicolon separated, can be used to set failover and master recorder addresses. --> <NetworkInterface></NetworkInterface> <!-- HTTP Web server URI --> <URI>/vms/server</URI> <!-- Plate cache timeout in sec --> <CacheTimeout>30</CacheTimeout> <!-- URI for getting thumbnail image --> <ThumbnailBaseUri>/axis-cgi/jpg/image.cgi</ThumbnailBaseUri> <ThumbnailUseCamera>Yes</ThumbnailUseCamera> <ThumbnailResolution>320x240</ThumbnailResolution> </AxisANPR> -
On this section you need edit <NetworkInterface></NetworkInterface>
-
Add there VMS Server IP address and if there is failover, add this too
-
Do this for all needed servers
-
Please remember that driver update or VMS update, overwrite this detail
-
-
Now you can save this file and replace the file in the DVR folder and restart the DVRServer service
Hanwha Wisenet and Vaxtor
-
Check that you have the latest Vaxtor LPR software installed on the camera
-
Check that Vaxtor LPR is licensed and working correctly
-
Check that you are using the latest Hanwha Wisenet driver for VMS
To get Vaxtor to send data to the VMS Server, there is a need to edit the driver xml file.
-
Open WisenetIPCapture.xml and edit this using Notepad
-
Default location C:\Program Files\DVMS\DVR
-
-
Find this section
<!-- Vaxtor ANPR configuration --> <Vaxtor> <!-- Possible values: Any IPv4 address. Empty value means default interface --> <!-- Several IP addresses should be semicolon separated, can be used to set failover and master recorder addresses. --> <NetworkInterface></NetworkInterface> <!-- HTTP Web server port (minimum port in range) --> <PortMin>9999</PortMin> <!-- HTTP Web server port (maximum port in range) --> <PortMax>11000</PortMax> <!-- HTTP Web server URI --> <URI>/vms/server</URI> <!-- Add or not thumbnail image to Vaxtor LPR event --> <Thumbnail>Yes</Thumbnail> </Vaxtor> -
On this section you need edit <NetworkInterface></NetworkInterface>
-
Add there VMS Server IP address and if there is failover, add this too
-
Do this for all needed servers
-
Please remember that driver update or VMS update, overwrite this detail
-
-
Now you can save this file and replace file in the DVR folder and restart the DVRServer service
Panasonic and Vaxtor
-
Check that you have the latest Vaxtor LPR software installed on the camera
-
Check that Vaxtor LPR is licensed and working correctly
-
Check that you are using the latest Panasonic driver for VMS
To get Vaxtor to send data to the VMS Server, there is a need to edit the driver xml file.
-
Open NewPanasonicIPCapture.xml and edit this using Notepad
-
Default location C:\Program Files\DVMS\DVR
-
-
Find this section
<!-- Vaxtor ANPR configuration --> <Vaxtor> <!-- Several IP addresses should be semicolon separated, can be used to set failover and master recorder addresses. --> <NetworkInterface></NetworkInterface> <!-- HTTP Web server port (minimum port in range) --> <PortMin>9999</PortMin> <!-- HTTP Web server port (maximum port in range) --> <PortMax>11000</PortMax> <!-- HTTP Web server URI --> <URI>/vms/server</URI> </Vaxtor> -
On this section you need edit <NetworkInterface></NetworkInterface>
-
Add there VMS Server IP address and if there is failover, add this too
-
Do this for all needed servers
-
Please remember that driver update or VMS update, overwrite this detail
-
-
Now you can save this file and replace the file in DVR folder and restart the DVRServer service
How to Enable Easy LPR
-
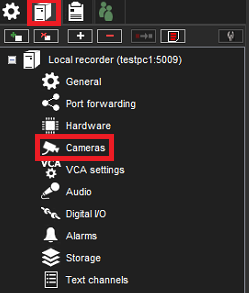
Open VMS Servers
-
Open Cameras
-
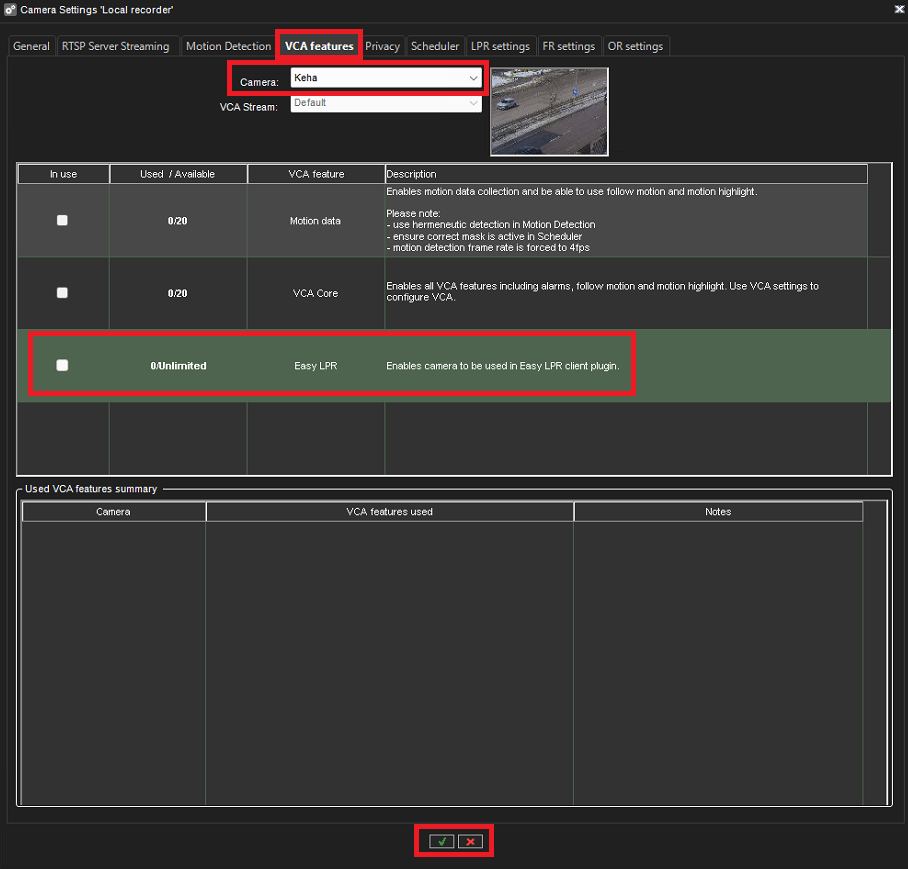
Click VCA features
-
Select LPR Camera
-
Enable Easy LPR
-
Click Save
Create an alarm from an Easy LPR event
-
Go to the VMS Servers tab
-
Open Alarms
-
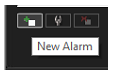
Click New Alarm
-
Enter all needed information in the General tab
-
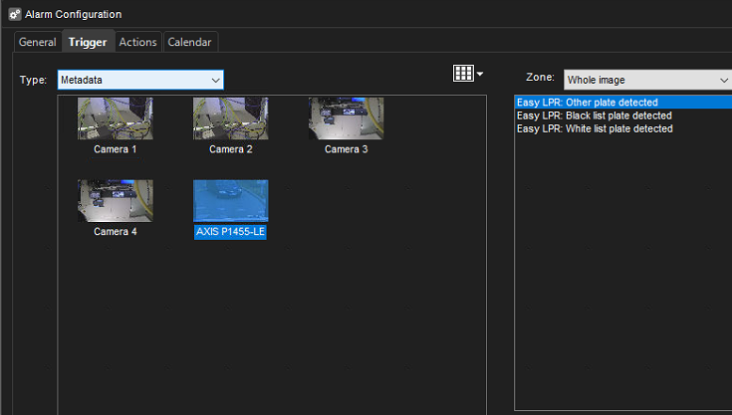
Open Trigger tab
-
Select trigger type Metadata
-
Select LPR camera
-
Select correct event
-
Easy LPR: Other plate detected
-
Easy LPR: Black list plate detected
-
Easy LPR: White list plate detected
-
-
Enter the actions of the alarms
-
Set calendar
-
On default alarms are on 24/7
-
-
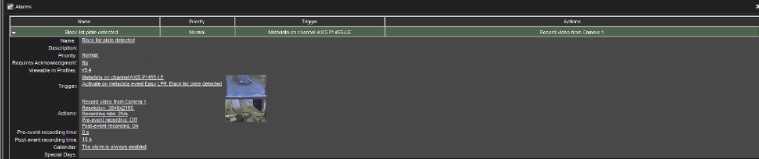
Check overall view of the alarm
-
Click OK to confirm an alarm creation
Using Easy LPR
Easy LPR contains the following functionalities:
-
Live monitoring from 1 camera at the same time
-
The search of the number plates
-
Lists Management
-
Digital output controlling based on lists
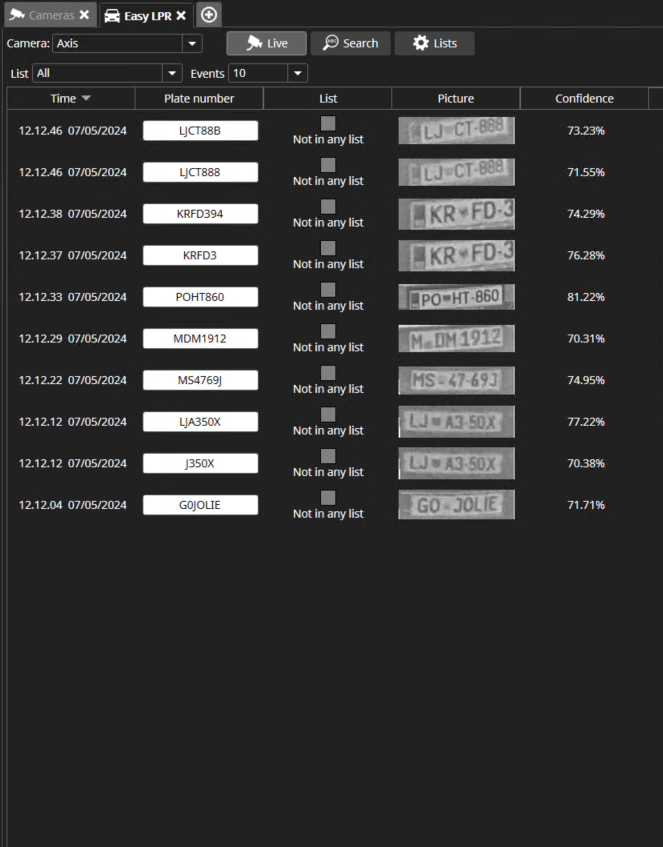
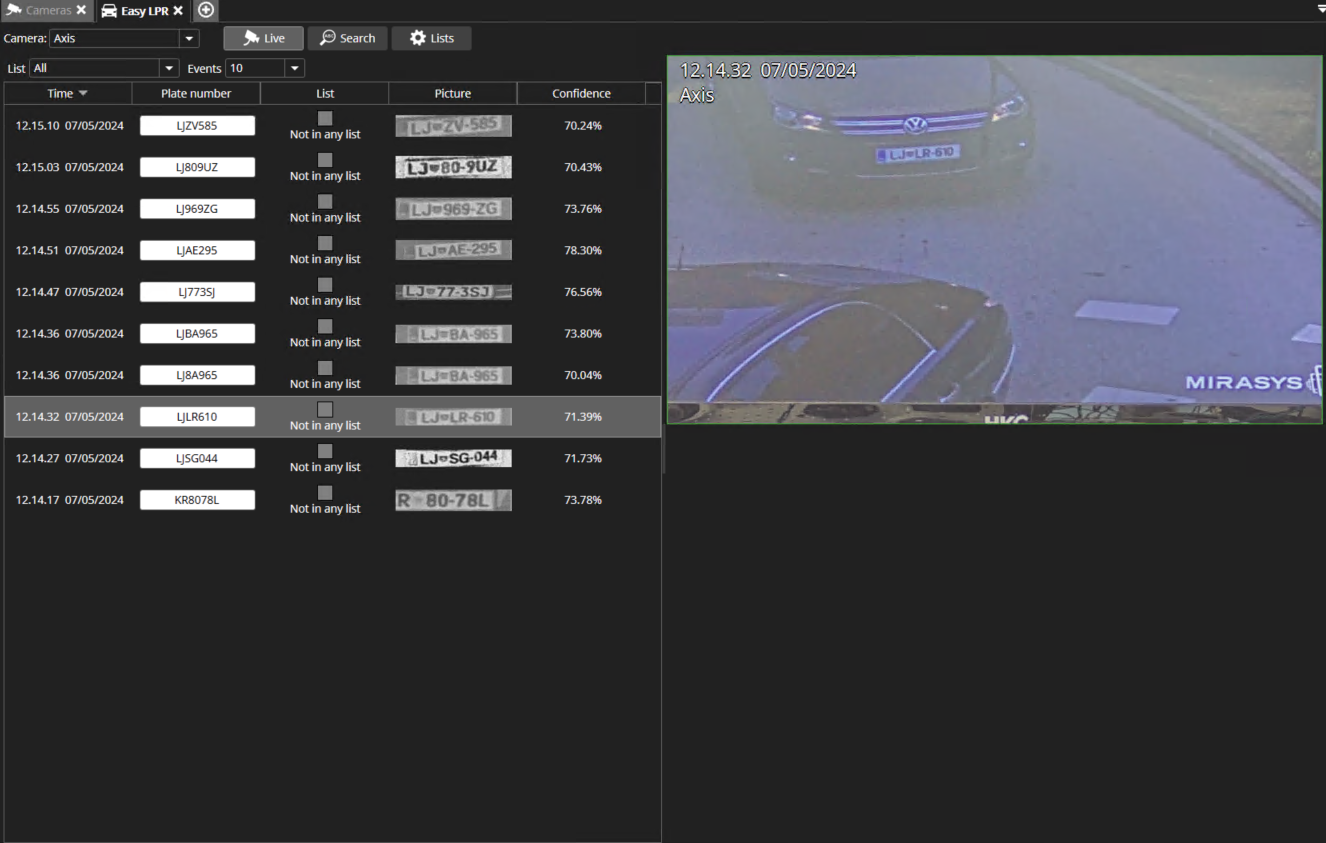
Live
The live tab shows the following information:
-
The selection of the LPR camera
-
Time of the plate detection
-
Plate number
-
Plate list
-
Picture of the plate number
-
Confidence of the plate reading
-
Live view from the LPR camera
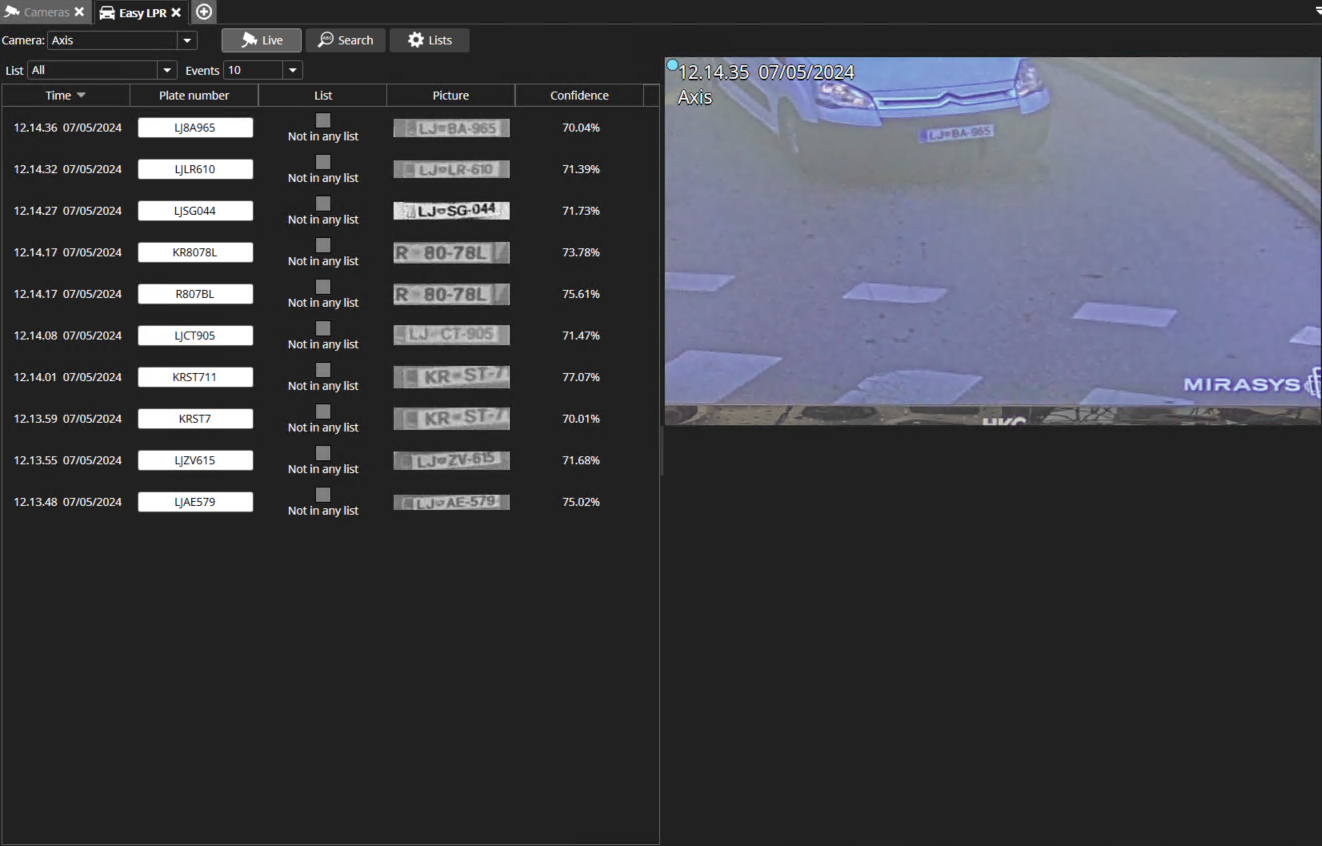
When the plate information is clicked by the mouse, then the view changes to the playback mode and shows the recorded situation.
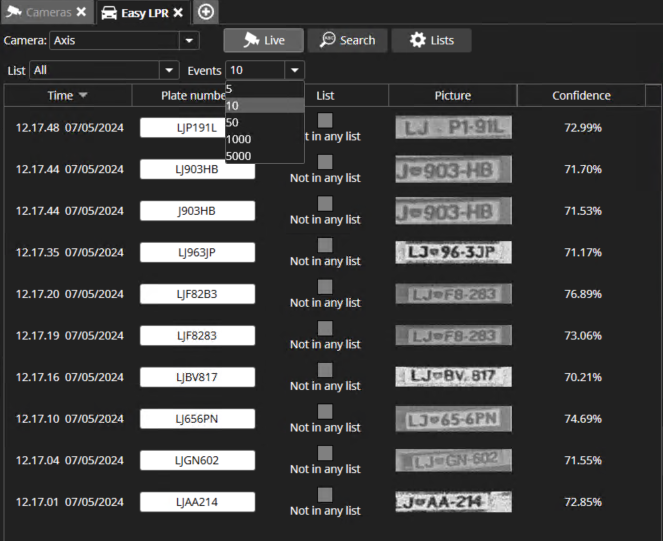
Filtering the Live view
-
Supported since v9.5
The user can which list is shown in the Live view. Options are:
-
All
-
Not in any list
-
Black list
-
White list
-
Black list and White list

The user can set the amount of the result in the Live view. Options are:
-
5, 10, 50, 1000 and 5000
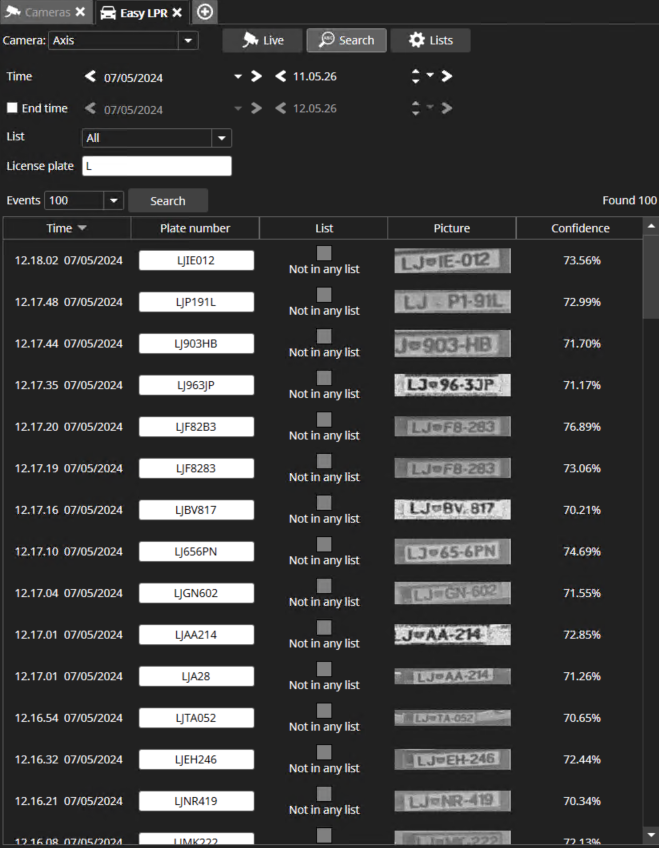
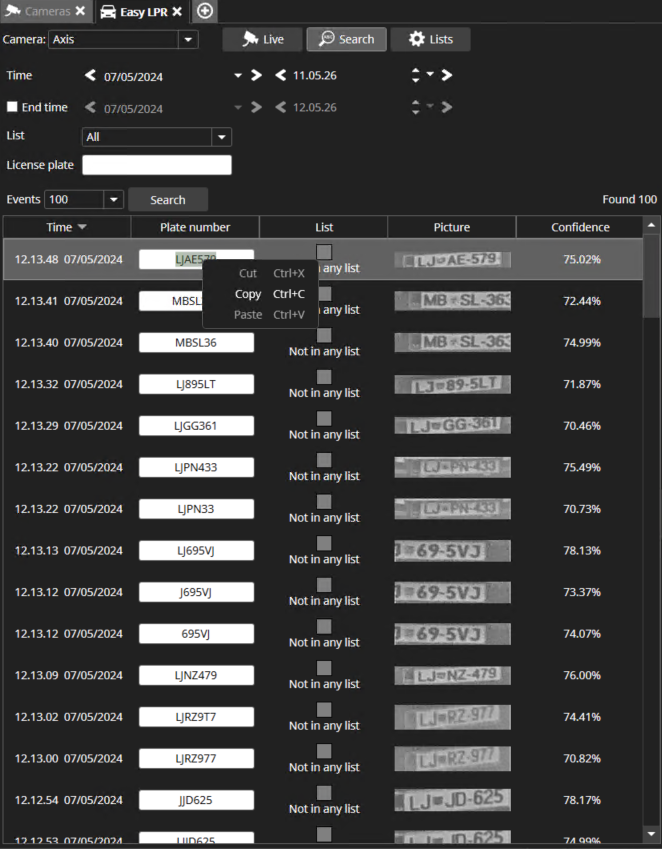
Search
-
Open Search tab
-
Select the LPR camera from the upper left corner
-
Select the time and date
-
Enter End time, if needed
-
Select the list for the search
-
All
-
Not in any list
-
Black list
-
White list
-
Black and white list
-
-
Enter license plate(partial information is also accepted)
-
Click Search
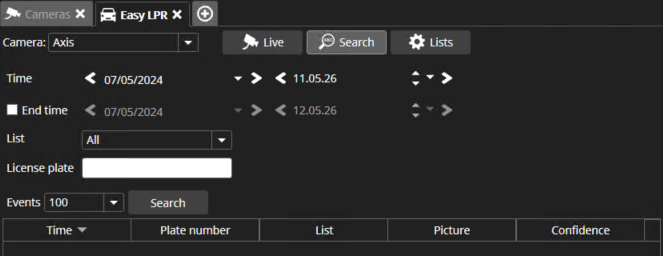
The search will show all results. The user can playback selected time and use all normal playback functions.
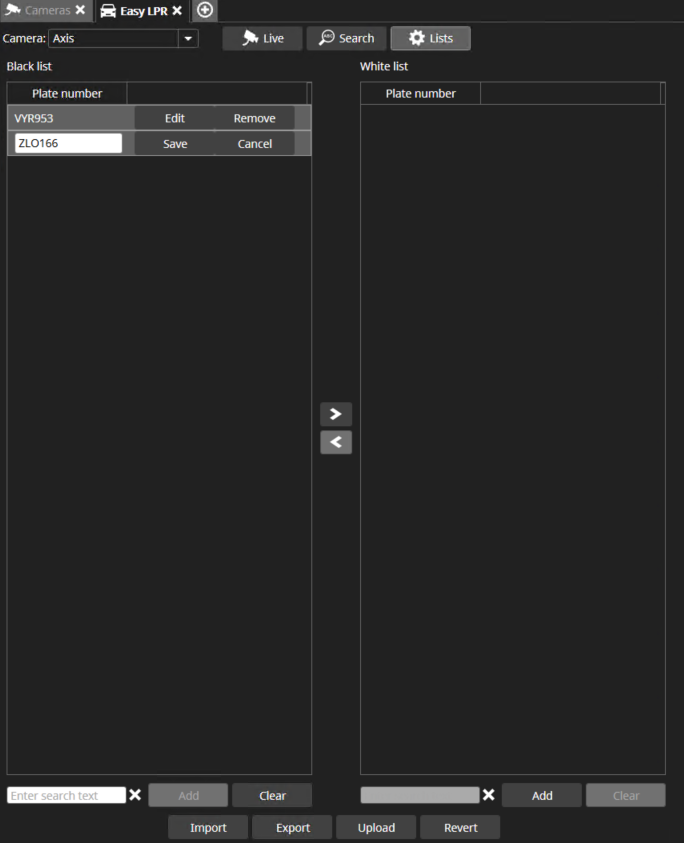
Lists
With the Easy LPR Lists Management, the users can do the following actions:
-
Add plate number
-
Edit plate numbers
-
Move plate numbers between the lists
-
Export plate numbers from the Spotter to the PC(CSV)
-
Import edited plate number lists to the Spotter
-
Upload lists from the Spotter to the LPR cameras
Please remember to upload lists to the cameras after any change.
Adding Plate number
-
Select the Black list or White list
-
Click Add
-
Type the plate number
-
Click Save
Adding plate number from the search view
-
Double-click the plate number field
-
Right mouse click the top of the plate number
-
Click Copy
-
Open Lists
-
Select current list
-
Click Add
-
Paste plate number
-
Click Save

Editing Plate Number
-
Select the plate number
-
Click Edit

-
Do the modification and click Save
Moving Plate Numbers between the lists
-
Select the plate number from the list
-
Click the arrow to move the needed list

Export Plate Number lists
-
Click Export

-
Define the destination folder
-
Set the file name(.csv)
-
Click Save
Removing Plate Numbers
-
Select the plate number from the list
-
Click Remove

Importing Plate Numbers
With the import, the user can import a large number of plate numbers at the same time.
-
Open the exported CSV file
-
CSV content is shown below:
-
Plate number, List (1 = black list / 2 = white list)
-
LJ656PN,1
-
LJ731CV,1
-
LJZV585,1
-
LJZV584,2
-
-
Add a new line with format ZLO166,2 for each new plate number
-
Select correct list(List 1 = Black list, List 2 = White List)
-
Save changes
-
Click Import

-
Browse to the location of the CSV file
-
Select the file and click Open
Uploading lists
With the upload, the user can upload created black & white lists to the camera.
-
Select the camera, which list will be uploaded
-
Click Upload

-
Select cameras, where lists are uploaded
-
Click Upload

-
After the upload, the status field shows the information List uploaded to the camera
