VSM camera settings can be exported to a CSV file and imported to VMS from a CSV file. This allows administrators to make bulk changes to camera settings and then import changed settings to the VMS system. It is also possible to add new cameras to VMS using this functionality.
CSV file import and export
System Manager Hardware settings have the following buttons for exporting camera settings to a file and importing camera settings from a file in CSV format.
CSV file format
CSV file format for each camera uses the following header names.
-
Name - Name of the camera channel.
-
Number - Number of the camera channel on the VMS server.
-
Description - Camera channel description.
-
AdmDescription - Camera channel administrative description.
-
Address - Camera device address.
-
Port - Camera device port.
-
UserName - Camera device user name.
-
Password - Camera device password.
-
Driver - Driver name / native (search from all available native drivers) / ONVIF (use of ONVIF driver). Logic uses the first driver that includes the given driver name string. For example, axis → NewAxisIPCapture.
-
Channel - Used channel of the driver if the device supports more than one channel. With one-channel devices, this can be left empty.
-
IsInUse - Is the camera in use?
-
IsAudioInUse - Is audio in use if the driver supports it?
-
IsIOInUse - Is I/O in use. This has meaning only when exporting CSV files. At import, I/O is used automatically if the device supports it.
-
Is360 - Is 360 camera.
-
Framerate - Recording stream frames / second rounded to close available value. The header for other streams: Framerate1, Framerate2, Framerate3.
-
Resolution - Recording stream resolution in format width x height (for example 1920x1080) rounded to close available value. For other streams: Resolution1, Resolution2, Resolution3.
-
Codec - Recording stream used compression codec. Rounded to close available value: JPEG, MPEG, H264, WMC9, PARSE, H265, MXPEG. For other streams: Codec1, Codec2, Codec3.
-
Quality - Recording stream compression quality rounded to close available value in range 1-100. For other streams: Quality1, Quality2, Quality3.
-
Bitrate - Recording stream bit rate rounded to close available value. For other streams: Bitrate1, Bitrate2, Bitrate3.
Export
Users can select the folder where the camera settings CSV file is exported to and give the name of the file. Users can also define the delimiter that is used in the CSV file.
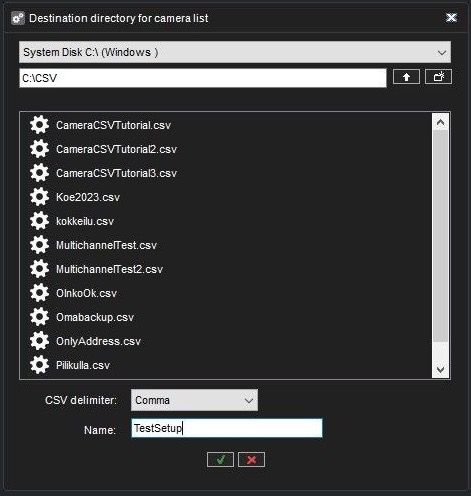
When the export is successful, a blinking green icon is shown. In error, a blinking red icon is shown.
Import
When the user clicks the import button, the select file dialog is shown to select the CSV file to import. When the file is selected, the camera adding view is shown if CSV file parsing and validation are done successfully.
The following validation rules are used when parsing imported CSV files.
-
CSV file column delimiter is a comma (,) or semicolon (;).
-
The order of the header names (i.e. column order) is free.
-
Unused header names (i.e. columns) can be left off.
-
Only the Address header name is mandatory. If it is missing, CSV file data is not accepted.
-
If some property names and data do not exist, an internal default value is used.
-
For validation errors and warnings, a message popup is generated, and more information is printed in the System Manager log.
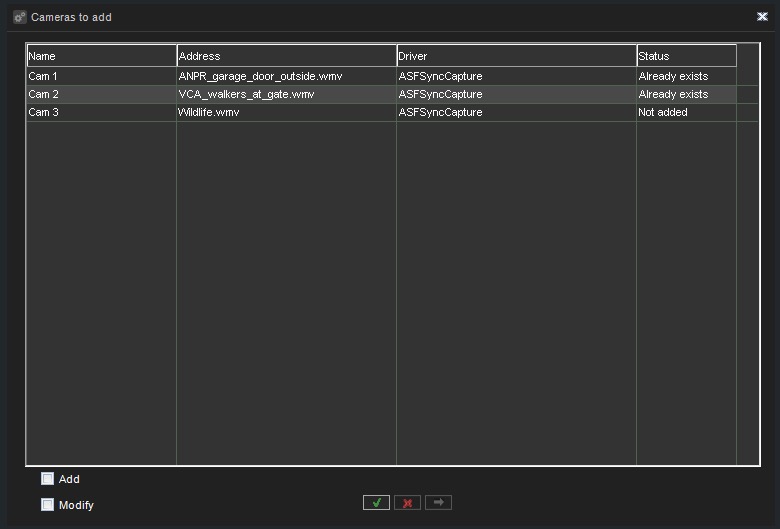
After the CSV file validation and parsing, the status column informs if the camera is already added to the system (Already exists) or if it is the new camera (Not added). Add and Modify check boxes appear if there are modifications to existing cameras and new camera configurations in the imported CSV file. These options can be used to select if cameras from the CSV file are added and/or modified. Execute button is enabled when there are cameras to be added or modified. By clicking the execute button, settings from the CSV file are applied (modified and/or added) to the current settings. After the settings apply, the status for each camera is updated, Dialog can be closed after the settings apply by clicking the ok button or from the cancel button before the settings apply. Modified camera settings and/or added cameras are applied to the VMS server once the hardware settings are saved.