List management makes it possible to define identities and lists so that the allowed or not allowed identities can be defined.
The settings define and manage identity and list management settings. Settings allow you to:
-
Add, edit, and delete identities containing license plates and face images
-
Add, edit, and delete lists and manage list content
-
Import and export lists and identities
-
Configure LPR and FR event database retention limits
-
Enable and define integration and its settings
The System Manager application provides several dialogs to access and modify the list management service data and settings. The dialogs can be found in the “System settings“ section.
Integration requires LPR and FR integration licenses.
List Management Settings
How to open the List Management Settings dialog:
-
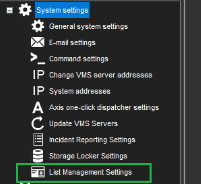
Go to the System tab
-
Under System settings, double-click the List Management Settings tree node, as shown in the picture below:
-
When you double-click List Management Settings, the dialog loads the settings from the list management service and displays them if successful. If loading fails, an error message is displayed to the user, and the dialog is closed.
List Management Settings dialog
In the dialog, you can find the following tabs:
-
Identities - list of identities and their settings
-
Lists - identity lists and their settings
-
Import/Export - import/export functionality to restore/save list management data to CSV text format
-
Database Settings - parameters related to the list management service database
-
Integration Settings - integration enabling and integration settings
All changes you make in these dialog tabs can be saved by clicking the OK button.
If you do not need to keep the changes, you can close the dialog with the Close or the Cancel button.
Below you can find a detailed description of each tab.
Identities tab
In the Identities tab, you can perform operations with identities:
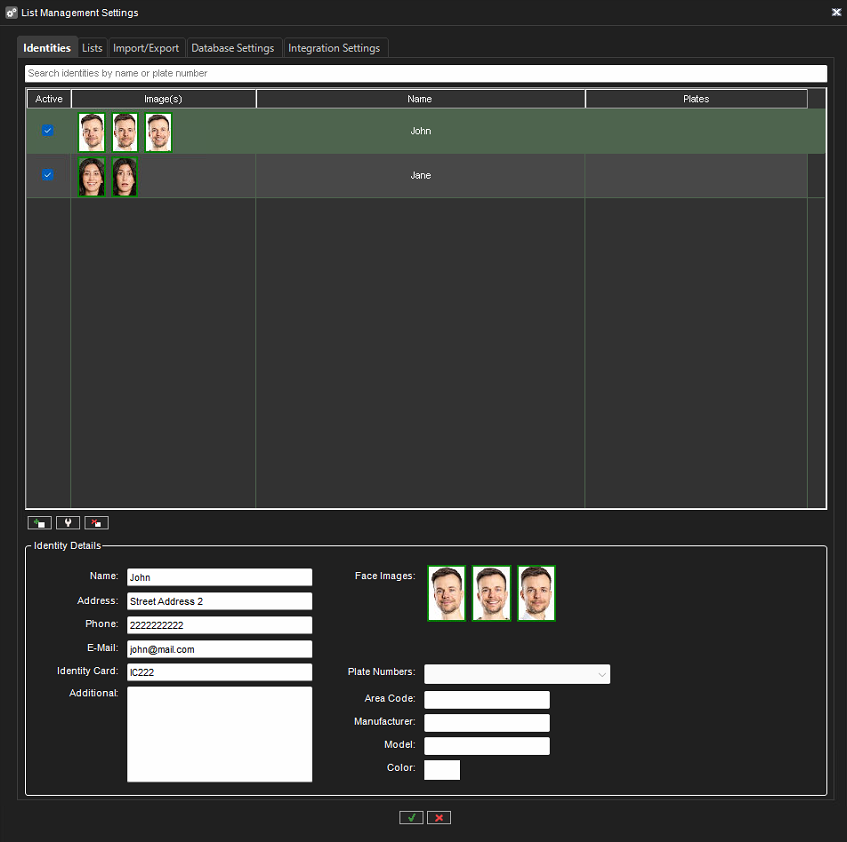
Identity selection is done using the left mouse button. If you must select multiple identities (multiple rows in the list), you can use the left mouse button + Ctrl/Shift keys. With multiple selections, you can set selected identities to the "active" or "not active" state by clicking the checkboxes in the “Active“ column.
Above the list of identities, you can find the Search field: when you type here, the list of identities is automatically filtered if the text is found in identity names or plates.
You can add and remove selected identities with the Add and Remove buttons below the identity list.
You can see detailed information about an identity in the Identity Details area, but all these fields are read-only. To modify the selected identity, you can click the Modify button or double-click it with the mouse button.
When you add or modify an identity, the following dialog is shown:
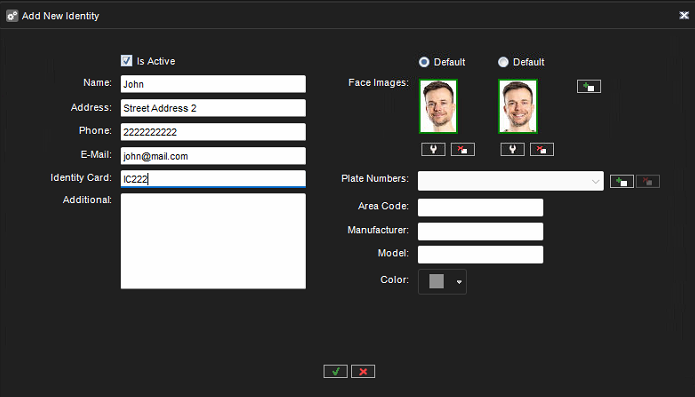
You can change any field of data or add/remove identity face images or vehicles (license plates).
To add a face image, click the Add a new face image button, and the following dialog will open:
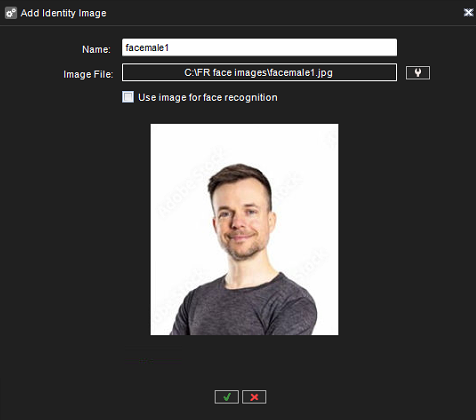
You can write a face image name and select a face image file here. After file selection, the image will be loaded, and the feature vector data of the image will be calculated. An image can be selected to be used in FR by selecting the “Use image for face recognition“ checkbox. To remove a face image, click the Remove selected face image button below the image in the Add/Modify Identity dialog.
The maximum number of face images for an identity is 3. All face images selected to be used with face recognition will be used when doing identity face matching, so using multiple face images for an identity may increase the face detection confidence.
To calculate the face feature vector, at least one face recognition service must be started and registered in the VMS.
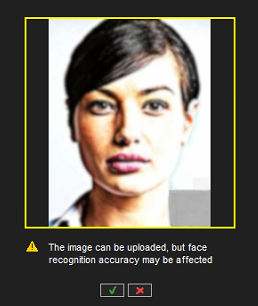
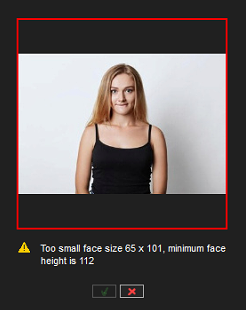
Face image quality requirements
Images used for face recognition require a minimum resolution of 168x256 pixels to prevent false matches. The minimum size of the face in the image is 112 pixels. If an image is detected as too large, it will be resized automatically.
The quality value of an image is indicated by one of three colors in an outline around the image. Red (low) means that the image is not accepted due to quality requirements not being met. Yellow (medium) indicates that while the image can be used, it is recommended to update to an image with higher quality. Green (high) means that the image meets the quality requirements and therefore can be used. The face quality value is displayed for all selected images in the identity settings, and the user will receive a warning message if at least one of the used identity face images must be updated. Identities in the identity list can be sorted based on image quality (lowest to highest or vice versa) by clicking the image column.

Selecting images for FR and LPR
The system administrator can select which identity images are used for FR and LPR. High-quality images are recommended, as they help face detection to function more accurately. When only License Plate Recognition is in use, the administrator can select any identity image to be used. An image can be selected for FR by checking “Use image for face recognition“ in the identity image upload dialog, or by modifying an existing identity and clicking Edit selected identity image, which opens the identity image dialog where the same checkbox can be ticked.
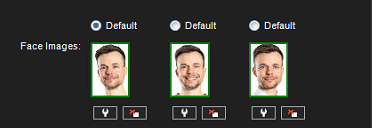
Set face image as default
One of the face images for an identity will be used as the default image. An identity image can be set as the default image by clicking the radio button for Default above the image in the Add/Modify Identity dialog:
Add or remove vehicles
You can add or remove vehicles. To add a vehicle, click the Add a new vehicle button, and the following dialog will open:
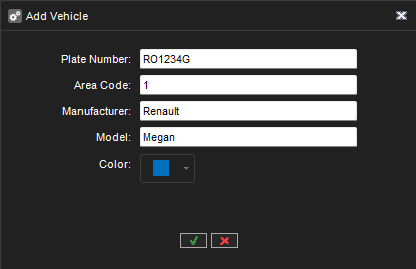
In the Add Vehicle dialog, you can type the license plate number, area code, manufacturer, model, and vehicle color. To remove a vehicle, you need to select it in the combo box and click the Remove selected vehicle button.
Lists tab
In the Lists tab you can perform operations with identity lists:
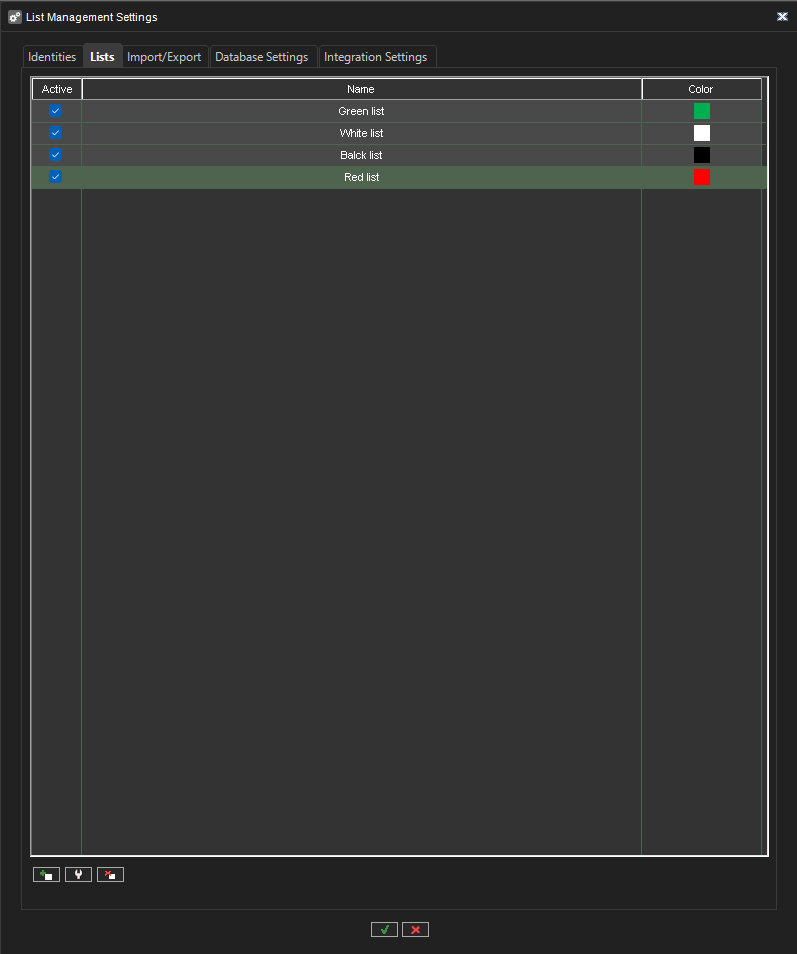
List selection is done using the left mouse button. If you need to select multiple lists (multiple rows), then you can use the left mouse button + Ctrl/Shift keys. With multiple selections, you can set selected lists to the active or not active state by clicking the checkboxes in the Active column.
You can add and remove selected lists with the Add and Remove buttons below the lists.
To modify the selected identity list, you can click the Modify button or double-click it with the mouse button.
When you add or modify the identity list, the following dialog is shown:
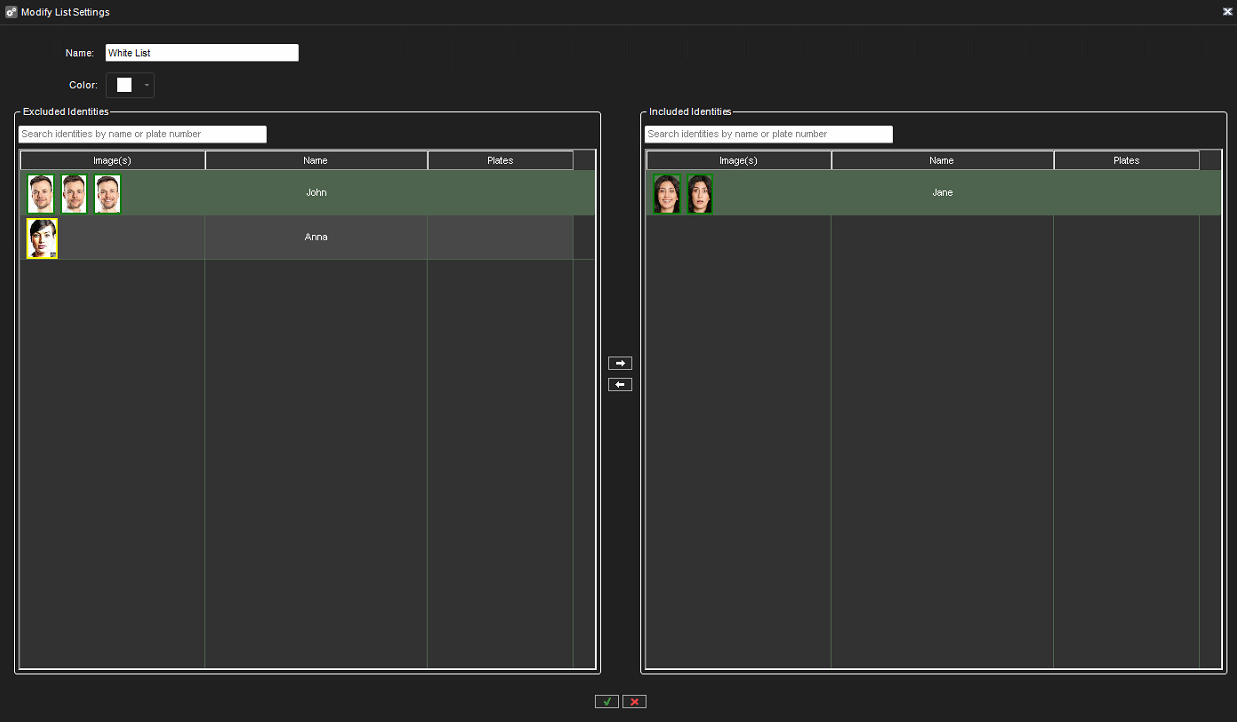
You can move identities to the list or remove them from the list, define the name of the list, and color.
Import/Export tab
In the Import/Export tab you can import list management data from a CSV file or export list management data to a CSV file:
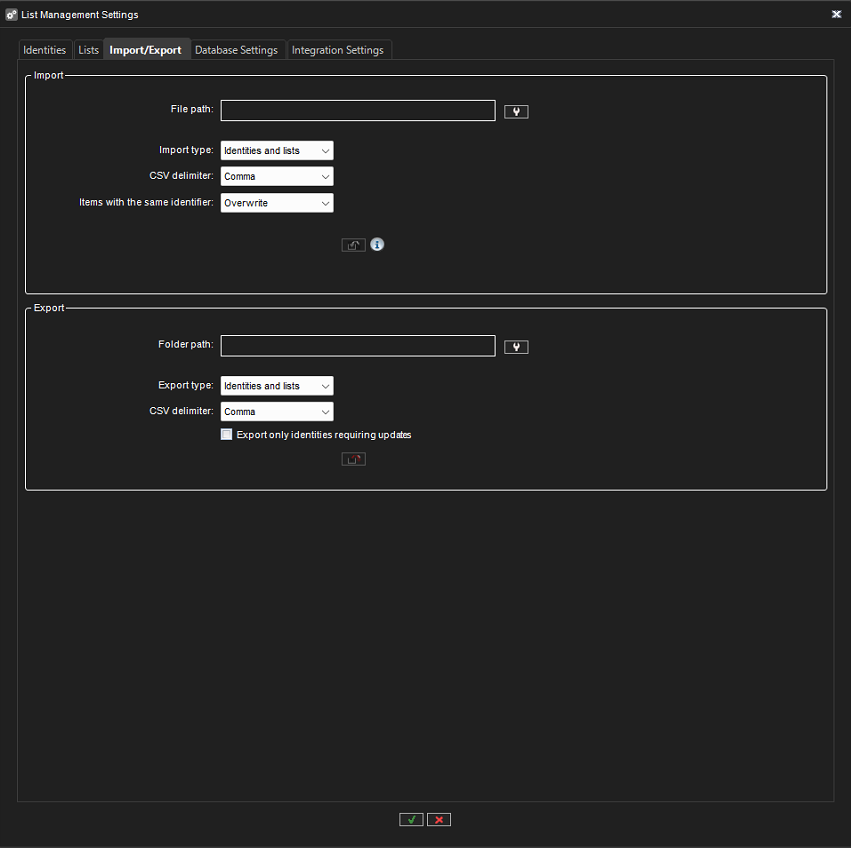
Import parameters
The following parameters must be set for the import process:
-
File path - path to the CSV file which contains list management data
-
Import type - “Identities only“ or “Identities and lists“
-
CSV delimiter - “Comma” or “Semicolon“
-
Items with the same identifier - “Skip“, “Overwrite“, or “Create new“ identifier for them
When the correct parameters are selected, the Import data from file button is active, and the user can start the import process. During the process, the user will see the progress and result of the import.
Export parameters
The following parameters must be set for the export process:
-
Folder path - path to the folder where list management data will be exported and where the CSV file will be created
-
Export type - “Identities only“ or “Identities and lists“
-
CSV delimiter - “Comma” or “Semicolon“
-
Export only identities requiring updates - can be turned on or off
When the correct parameters are selected, the Export data to file button is active, and users can start the export process. During the process, users will see the progress and result of the export.
When the system is upgraded to a new version, old face images with compatibility issues that are used with FR must be re-added for all identities in the List Management settings. The user will receive a warning about this in the LMS installer (the warning is only shown if the upgrade contains face feature vectors from an older version). Identity images can be updated one by one or in bulk using the CSV file import and export. If the CSV import contains low-quality face images, the user will receive a warning. Identity export can be used for exporting only the identities with low-quality images, making it easy to update a large number of outdated images.
Database Settings tab
In the Database Settings tab, you can set up database settings for the list management service:
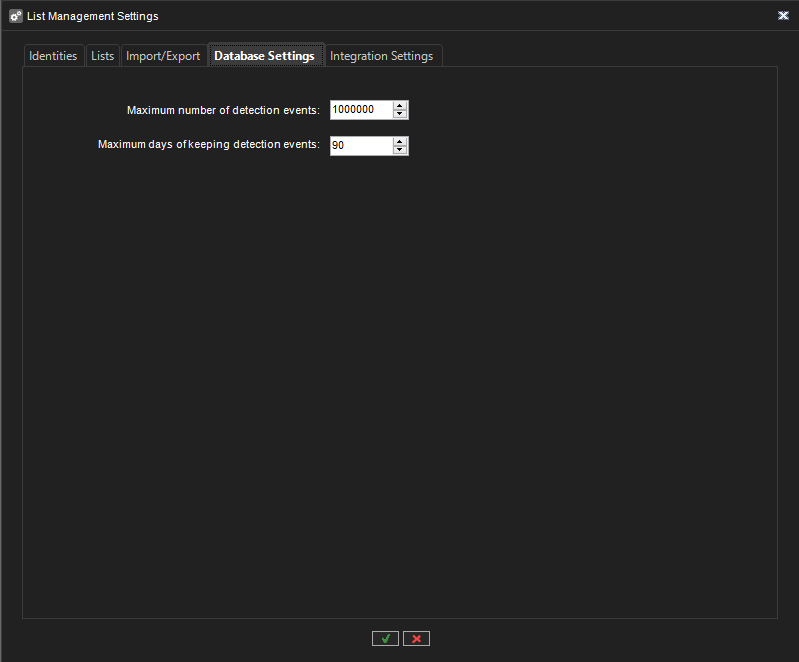
Changes to the settings don’t affect disk usage or the size of the database until a cleaning of the database is completed.
WARNING: Using high limits may lead to unintended mass data deletion and increased system load. It is recommended to start with smaller limits and verify the results before executing larger operations.
Integration Settings tab
In the Integration Settings tab, you can set up integration settings for the list management service:
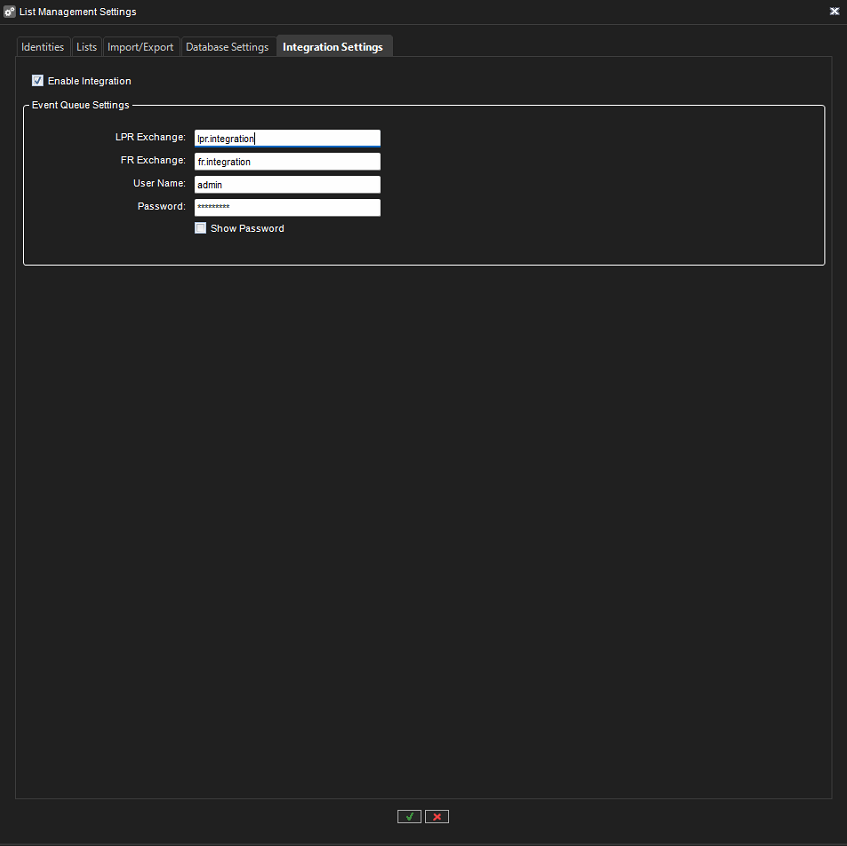
Here you can define settings for the event queue and enable/disable integration settings. The tab is not visible if the license does not enable list management integration.
List management data update notification
If list management data has been changed in another application, the System Manager will receive an event with updated information and display the following message:
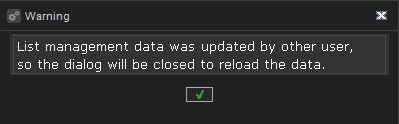
When you click the OK button of the message dialog, all settings dialogs will be closed to reload data from the list management service. All changes that were not saved will be lost.