To access motion detection configuration in the System Manager, go to VMS Server Settings > Camera Settings > Motion Detection.
-
Select the camera in the Camera drop-down menu.
-
Under Mask settings, select the mask you want to configure.
You can change the name of the mask. Click Change Mask Name and type a new name for the mask.
Please note that the Default mask configuration cannot be changed. -
Draw the mask on top of the image to select for which area the motion detection feed will be calculated. Use the drawing tools to the right of the view, and with the drawing tools you, paint the areas red where you want the system to detect motion and you remove the red from areas where you want to ignore motion.
Drawing Tools
|
Tool |
Name |
Description |
|
|
Pencil |
Use to set the motion detection area. Select the pencil size by clicking one of the tool size buttons (large, medium, small). |
|
|
Eraser |
Use to erase selected areas that you do not want to include. Select the eraser size by clicking one of the tool size buttons (large, medium, small). |
|
|
Lasso |
Use to select areas using straight lines. If the pen tool is selected, using this tool adds to selected areas. If the eraser tool is selected, this tool removes from the selection. Click the image where you want to start the selection. Click again where you want to anchor the line and change direction. To complete the selection, click the starting point. The selected area is painted red, or the red colour is removed. |
|
|
Fill/Clear |
If the pen tool is selected, clicking this button selects the total image area. If the eraser tool is selected, clicking this button removes all selections. |
|
|
Invert |
Reverses selected and unselected areas. Sometimes it is easier to select the area you do not want to mask and then invert the selection. |
|
|
Tool Size |
Click one of the buttons to select the size of the pencil or eraser (large, medium, small). |
-
Set the detection sensitivity by using the slider.
-
Set the minimum quantity of motion by using the slider.
-
Select the motion detection method. You can select comparative, adaptive, or hermeneutic motion detection. For a more in-depth description of these options please see the previous page.
-
Select either to use the default value for Motion detection frame rate, or use the slider.
-
Select the Motion detection platform, either only the VMS Server or the VMS Server and camera hardware.
-
Once the configuration is finalized, the motion detection masks must be taken into use by using the scheduler. To access motion detection configuration in the System Manager, go to VMS Server Settings > Camera Settings > Scheduler. Please see the next document for instructions on how to use the Scheduler.
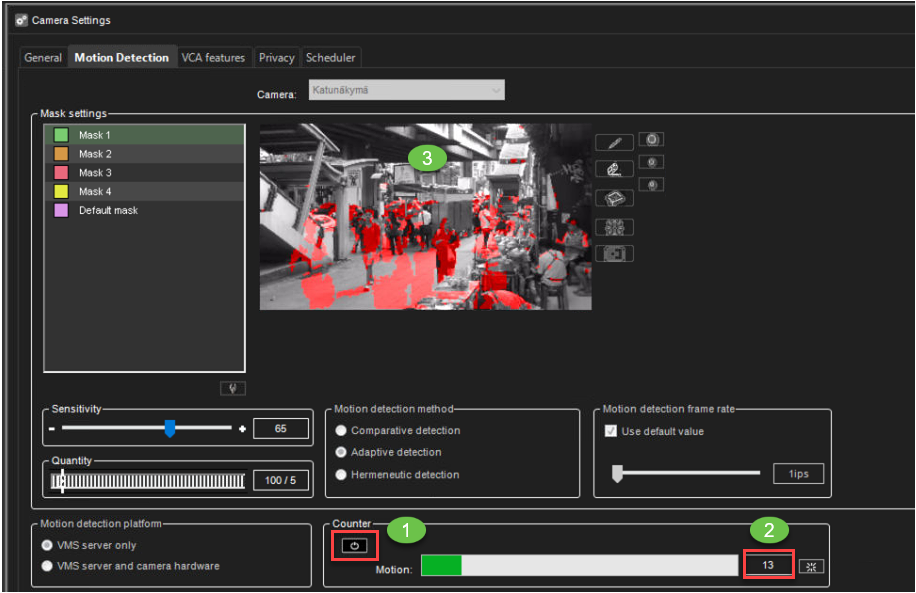
Counter
To test motion detection, you can use the counter. When you enable the counter, the video will be streamed from the camera and the motion detection is calculated. The result of the motion detection is shown on top of the image. The counter values increases everytime motion is detected, based on your configuration.
To use the Counter:
-
Enable Counter
-
Check the motion values
-
The camera image shows which area of the camera image causes motion detection recording
Pre- and Post- recording time
If you want recorded material before and after the motion, use Motion pre- and post-recording.
-
Each mask can be configured separately.
-
Values are from 0s to 60 minutes.
-
You can copy selected values to the all cameras using button Copy pre-and post recording time for all cameras.