The Paxton Net2 Access Control System Proxy is a separately installable service. With this service, the VMS system can receive Paxton event messages from the Paxton Net2 Access Control System. The proxy should be installed on all VMS servers that are required to get event messages from the Paxton Net2 Access Control System. Proxy configuration is done by using the VMS server Text Channels feature.
The integration supports 140 event types in total. Here are only a couple of examples:
-
Card Swiped - User has used the access card reader.
-
Access Denied Invalid Card - User has tried to use an invalid card.
-
Door Forced - The door has been forcibly opened.
-
Door Left Open - The door has been left open.
-
Intruder alarm - Intruder has been detected.
-
Tamper alarm - Tampering has been detected.
-
Fire alarm Input - A fire alarm has been detected.
-
Access Denied - User has no access rights.
Requirements
To install the Paxton Net2 Access Control System Proxy, the following requirements have to be fulfilled:
-
The .NET Framework 4.8 or newer is installed on the machine.
-
The proxy service installation requires the administrator’s user rights.
Installation
To install the Paxton Net2 Access Control System Proxy, follow the instructions:
-
Download the Paxton Net2 Access Control System Proxy installer from the Extranet.
-
Extract the zip file to a temporary folder, for example, to “C:\Temp\”
-
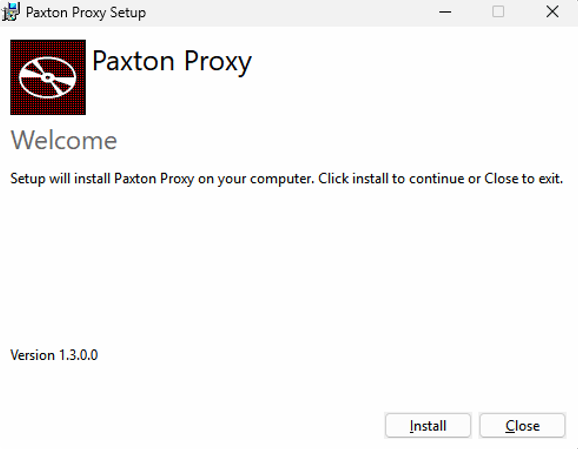
Double-click the installer file.
-
On the installation dialog, click the Install button to continue.
-
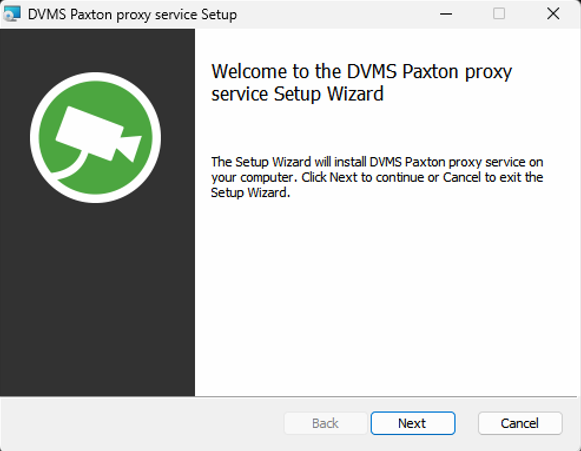
Click the Next button to continue.
-
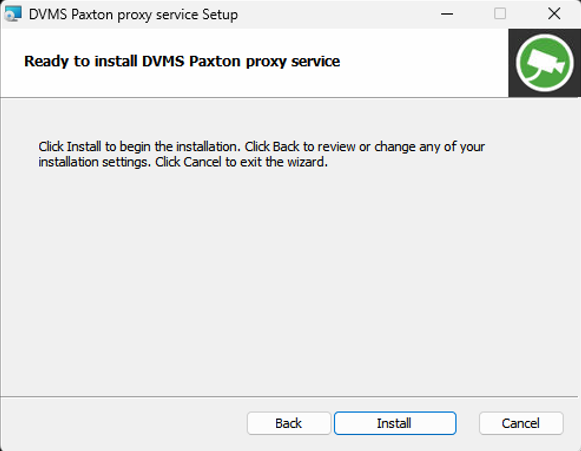
Change installation location if needed and click the Next button to continue.

-
Click the Install button to start installing the proxy service and wait for the installation is finish.
-
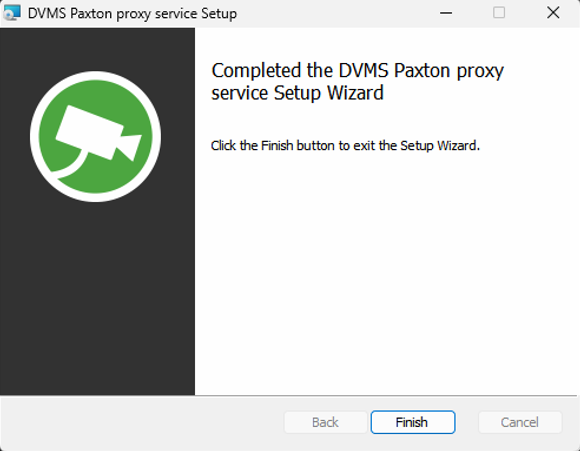
Click Finish to close the installation.
-
Now Paxton Net2 Access Control System Proxy is installed on the VMS server.
-
After installation, copy the following UDD configuration files from the proxy installation folder “C:\Program Files\DVMS\PaxtonProxy\“ to the VMS installation folder “C:\Program Files\DVMS\DVR\“.
-
UDD4PaxtonProxy.xml
-
PaxtonProxy.xsd
-
Configuration
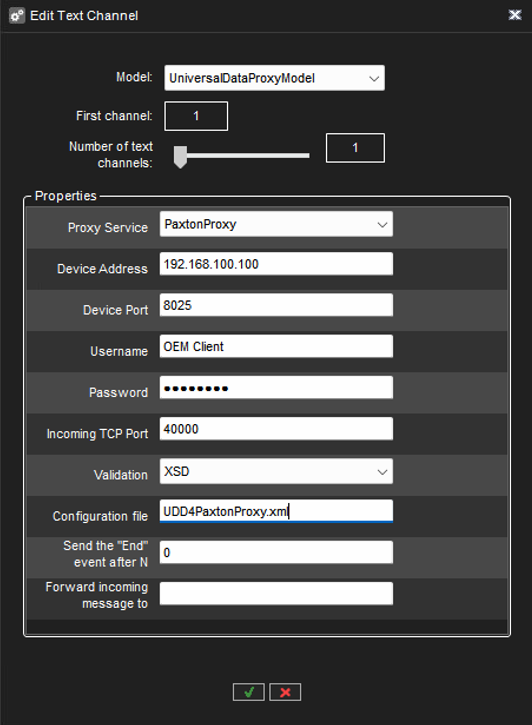
To configure the Paxton Net2 Access Control System Proxy, follow the instructions below:
-
Create a new Text Channel for the proxy in the System Manager Text Channel settings.
-
In the Text Channel settings, select first the model ‘UniversalDataProxyModel’
-
Set the following settings for the model:
-
Proxy Service: PaxtonProxy
-
Device Address: Paxton Net2 Access Control System IP address
-
Device Port: Paxton Net2 Access Control System port, default is 8025 TCP
-
Username: Paxton Net2 Access Control System username
-
Password: Paxton Net2 Access Control System password
-
Incoming TCP Port: This is the port for Proxy internal communication, Default 40000
-
If the same server has multiple Paxton Net2 Access Control Systems that use Proxy, this port needs to be different for each Text Channel; for example, starting from 40000, 40001, etc.
-
-
Validation: XSD
-
Configuration file: UDD4PaxtonProxy.xml
-
Send the “End” event after N; 0
-
Forward incoming message to: Empty string
-
-
Save the settings.
Testing the configuration
To test the Text Channel configuration, do the following:
-
Add the configured Text Channel to a profile that is loaded by the user when logging into the Spotter application.
-
Open the Text Channel view from the profile tree by double-clicking the Text Channel.
-
The data received from the Paxton Net2 Access Control System is shown in the Text Channel view.
Troubleshooting
If the data is not seen in the Text Channel view, check the following, modify the settings, and test again.
-
Check from the firewall that the communication is allowed on the defined ports.
-
Check in the System Manager Text Channel settings that the username and password are valid.
-
Check that the event name matches the event name that is defined in the XML configuration file.
-
Check the rest of the configuration and test that the Paxton Net2 Access Control System is working as it should.
-
If a Paxton Net2 Access Control System metadata event is missing, edit the XML configuration file to add the missing event and restart the proxy and VMS services.
Alarm configuration
After the communication is tested to work, and the data from the Paxton Net2 Access Control System is shown in the Text Channel view, the alarms can be configured in the System Manager alarm settings by using the Paxton Net2 Access Control System metadata events as alarm triggers.