About default action types and their parameters.
Some of the action types listed above may not be available on all systems.
In addition to the default actions, the system may include alarm actions installed through third-party modules.
Camera Recording
Camera recording is the default action for cameras. When an alarm that contains this action type is triggered, the recording settings defined by the alarm type will be used instead of the camera’s default settings.
In Spotter, if alarm pop-up windows are enabled for the user profile, devices used with the Camera recording action are displayed in the alarm pop-up view when the alarm is triggered.
The action includes the following fields and parameters:
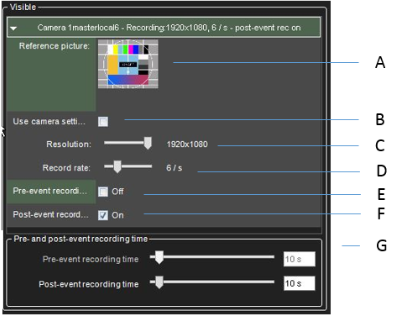
Reference picture
This static field contains the reference picture (image) of the camera (A).
Use camera settings
The alarm recording will be performed using the camera-specific resolution and record rate setting by marking this checkbox (B).
Resolution
Use the slider to change an IP camera’s resolution during alarm recording. The slider is active only for IP cameras (C).
Record rate
Use the slider to change the camera’s IPS rate during alarm recording. The slider is inactive if the Use camera settings checkbox is marked (D).
Pre-event recording
Mark this checkbox to set the pre-event recording on. The duration of the pre-event recording can be set through the Pre-event recording time slider (E).
Post-event recording
Mark this checkbox to set post-event recording on. The duration of the pre-event recording can be set through the Post-event recording time slider (F).
Pre- & post-event recording duration
These sliders can be used to set the pre-and post-event recording durations for the action. The sliders are active only if pre-event and/or post-event recording has been activated (G).
All devices (cameras and microphones) are connected to the alarm and have their pre-and post-event recording activated to share the same pre-and post-event recording durations.
Audio Recording
Audio recording is the default action for microphones. When an alarm that contains this action type is triggered, the recording settings defined by the alarm type will be used instead of the microphone’s default settings.
In Spotter, if alarm pop-up windows are enabled for the user profile, devices used with the Audio recording action are displayed in the alarm pop-up view when the alarm is triggered.
The action includes the following fields and parameters:
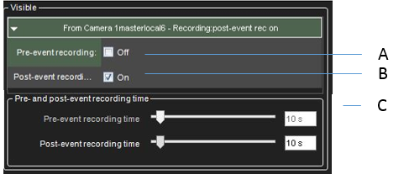
Pre-event recording
Mark this checkbox to set the pre-event recording on. The duration of the pre-event recording can be set through the Pre-event recording time slider (A).
Post-event recording
Mark this checkbox to set post-event recording on. The duration of the pre-event recording can be set through the Post-event recording time slider (B).
Pre- & Post Recording duration
These sliders can be used to set the pre-and post-event recording durations for the action. The sliders are active only if pre-event and/or post-event recording has been activated (C).
All devices (cameras and microphones) connected to the alarm and have their pre-and post-event recording activated to share the same pre-and post-event recording durations.
Digital output
The digital output is the default action for digital I/O devices. When an alarm that contains this action type is triggered, the I/O device is activated.
Even though the Pre- & Post Recording duration sliders are displayed for the action type, they do not affect the functionality of the action.
PTZ (Dome) Preset Position
The PTZ preset position action can be used to set a PTZ camera to a specified preset position.
When an alarm that contains this action type is triggered, the PTZ camera will automatically move to the selected preset position.
Please see Mirasys VMS Spotter User’s Guide for information on setting PTZ camera preset positions.
It should be noted that this action moves the PTZ camera to a preset position but does not result in the video feed from the PTZ camera being displayed in the alarm view in the client application unless other alarm actions, such as Camera recording, has been selected for the PTZ camera.
The action includes the following parameters:
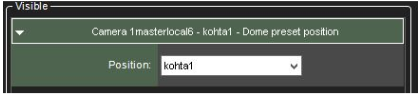
Position
Use the drop-down menu to select the preset position to which the PTZ camera will move during the alarm.
Even though the Pre- & Post Recording duration sliders are displayed for the action type, they do not affect the functionality of the action.
PTZ (Dome) Camera Tour
The PTZ camera tour action can be used to set a PTZ camera to start a pre-programmed PTZ camera tour. When an alarm that contains this action type is triggered, the selected PTZ camera tour is started. Please see Mirasys VMS Spotter User’s Guide for information on setting PTZ camera tours.
It should be noted that this action starts the PTZ camera tour but does not result in the video feed from the PTZ camera being displayed in the alarm view in the client application unless other alarm actions, such as Camera recording, has been selected for the PTZ camera.
The action includes the following parameters:
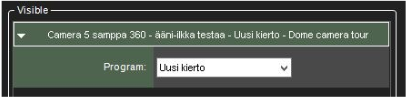
Program
Use the drop-down menu to select the PTZ camera tour, starting when the alarm is triggered.
Even though the Pre- & Post Recording duration sliders are displayed for the action type, they do not affect the functionality of the action.
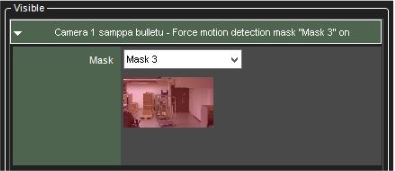
Set Motion Detection Mask
The Set motion detection mask action can change the motion detection mask used by a specific camera during the alarm. When the alarm occurs, the motion detection mask used for the designated camera is changed to the alarm specific mask. After the alarm ends, the system restores the default mask.
The action includes the following parameters:
Mask
Use the drop-down menu to select the motion detection mask that will be used during the alarm.
Even though the Pre- & Post Recording duration sliders are displayed for the action type, they do not affect the functionality of the action.
Send E-Mail
The Send e-mail action can be used to send e-mail to any email address or group configured in the E-mail settings in the System tab.
You can choose which recipient or group should receive the alarm.
You can also include one or more unscaled or scaled-down images in the alarm email. To do this, uncheck the Send in a short format -option and check the Attach images –option

After this, you can choose a camera, size for the image scaling, desired number of images, and the time span from which the images are fetched.
-
The number of images in this configuration is the maximum amount delivered. Fewer images might arrive
-
Attaching images to alarm emails might lead to high data traffic, so it is recommended to test the configuration settings to find the optimum setting.
-
If you experience issues that no images are arriving with the default settings, it is recommended to select more than one image to the “maximum images” setting and adjust the sliders slightly to have a longer duration of time where the images are being fetched.
The action includes the following parameters:
Format
Defines the message format as short or usual.
A short message will contain only up to 160 characters and cannot contain additional message text or image attachments (see below).
Message
This field contains the message that will be sent to the recipients if the alarm occurs. The message field is active only if the e-mail format has been set as long.
Unlike other alarm actions, the Send e-mail action can be selected only once for each alarm. Once selected, the action will disappear from the list of available actions.
The message will have the alarm name in the title.
Disable Alarms
The Disable alarms action can be used to send disable alarms based on one alarm. The configuration can be done so that all alarms are disabled, low and medium priority alarms, or low alarms.
This option allows specific alarms to remain active while others are suppressed.
The alarms are disabled only while the alarm that disables them is active.